Getting Started
This guide will get you up and running with QueryDesk. It covers your deployment options, then walks through connecting your first database, running a query, inviting a teammate, and sending a query through an approval flow.
You may notice references to Devhub throughout, which is the collection of tools that includes QueryDesk.
Deployment options
Cloud hosted
All cloud hosted installations are isolated and are single tenant. You can sign up for a free trial at querydesk.com. Signing up requires a work email address.
You will be assigned a unique subdomain, to customize it please reach out to support@devhub.tools.
Self hosted
QueryDesk is also available to be self hosted and is free for up to 5 users.
It currently is available as a helm chart, you can find the instructions here: https://github.com/devhub-tools/helm-charts/blob/main/charts/devhub/README.md.
If you need a different deployment method, please reach out to support@devhub.tools.
Bring your own cloud
If you would like us to manage your installation in your own cloud, please reach out to support@devhub.tools.
Before you begin
You will need the following to complete this guide:
- A database QueryDesk can reach. QueryDesk Cloud connects to your database from
35.224.237.12, so your database's firewall, security group, or allowlist must accept connections from that address. If your database can't be reached from the internet, QueryDesk can connect through a Tunnel running inside its network instead. - Two database users: a read-only user and a read/write user. QueryDesk uses these as credentials, and the pair is what makes approval flows possible. If you don't manage database users, get them from your IT, DevOps, Engineering, or Operations team before starting.
- A teammate's email address. Approvals need a second person. If you're evaluating on your own, a second email address you control works too.
Don't want to connect a real database for your trial? Create a sample database for your trial instead. The sample database belongs to Pinnacle Trust Financial Group (PTFG), a fictional bank. Every name, account, and number in it is fabricated. It runs on a free cloud PostgreSQL plan (free at the time of writing) and takes about 10 minutes to set up. It includes both database users this guide needs, and the examples in this guide use it.
Connect a database
The first time you sign in, QueryDesk asks you to connect a database. Everything else in QueryDesk starts from a connected database, so this step comes first.
- Select the database Engine. The default port for that engine is filled in for you.
- Complete the connection fields:
| Field | Description |
|---|---|
| Display name | Any name that's useful to you. This is how the database appears in QueryDesk. |
| Host | The IP address or hostname only. For example: 10.1.0.132 or mydb.cluster-abc123.us-east-1.rds.amazonaws.com. |
| Database name | The actual database name, not the display name. For MySQL, this is the schema name. |
| Port | The default for the selected engine. Change it only if your database listens on a different port. |
| Username | Your read-only database user. |
| Password | The password for that user. |
Use the read-only user here. You'll add the read/write user in Create an approval flow.
- If your database requires encrypted connections, expand Advanced and turn on Connect over SSL. Paste the server CA certificate, client key, and client certificate if your database requires them (these may be optional depending on your database configuration). Work with your IT, DevOps, or Engineering team if you need help obtaining these.
- Leave Verify server hostname (verify-full) off unless you know the server certificate's hostname matches the Host field. Many managed database services use certificates that won't match.
- Click Test connection. When Connection successful appears, click Finish setup.
If the connection test fails, check the network first. The most common causes are a firewall or allowlist that doesn't include 35.224.237.12, an incorrect host or port, or an SSL setting that doesn't match what your database requires. If the database isn't reachable from the internet, click connect through a Tunnel on the setup page.
First look at QueryDesk
After setup, a welcome window asks two optional questions about your role and what brings you to QueryDesk. Answer them and click Get started, or click Skip. Either way, you land on the Databases page with your database listed.
The Get started with QueryDesk checklist in the lower right of the page tracks the next four sections of this guide. Each item is checked off as you complete it.
The left navigation gives you access to everything in QueryDesk:
| Item | Description |
|---|---|
| Databases | Your connected databases and the starting point for running queries |
| Pending queries | Queries waiting for approval before execution |
| Query library | Your saved private queries |
| Shared queries | Queries shared across your organization |
| Dashboards | Data views built from your database connections |
| Workflows | Automated multi-step processes combining queries, API calls, and notifications |
| Audit log | A complete record of every query run against every connected database |
Apps, above the icons at the bottom of the left navigation, switches between the products your organization is licensed for. The Settings gear opens Settings, which has its own navigation listing every settings page; use Apps there to return to a product. Labels, the tags that organize saved queries, are managed from Query library: click Manage next to Labels.
Run your first query
On the Databases page, click Connect on your database. This opens the query interface.
The interface has three main areas:
- Left panel: lists the tables in the connected database. Click any table name to load a
SELECTquery for that table automatically. - Query pane: where you write or edit SQL.
- Results pane: where query output appears after execution.
Click a table name in the left panel, or type a query in the query pane, then click Run query. If you're using the PTFG sample database, this returns the first ten of the bank's fictional customers:
SELECT first_name, last_name, email, date_of_birth
FROM customers
LIMIT 10;
For PostgreSQL databases that have a public schema alongside other schemas, the left panel currently lists only the tables in public, even when public is empty. Databases without a public schema list their tables normally. PostgreSQL creates a public schema in every new database by default, so this applies to most databases that use additional schemas. Support for listing every schema is in development. In the meantime, tables in other schemas can still be queried by name, for example SELECT * FROM sales.orders;.
Results appear in the results pane below. From there, you can:
- Click Export to download the results as a CSV file.
- Click Share to generate a shareable link.
Query options
The arrow next to Run query opens the Run query window, where you can adjust these settings before execution:
| Option | Description |
|---|---|
| Timeout (seconds) | Stops the query if it hasn't completed within the specified time. Also adjustable via the gear icon in the command bar. |
| Run as | Selects which database credential the query runs under. |
| Run automatically on approval | For credentials that require review, runs the query as soon as it's approved, so it doesn't have to go back to the submitter to run. |
| Analyze query | Generates a query plan instead of returning results. When enabled, the action button changes to Analyze query, and results are replaced with the query analysis. |
The number of rows returned is capped at 500 by default. Adjust the limit, along with the timeout, via the gear icon in the command bar.
Saving a query
Click Save query to open a dialog where you can name the query and optionally mark it as private. Private queries are only visible to you. Queries saved without the private flag (default) are accessible to your team through the Query library.
Don't know SQL? Bring your own AI model and QueryDesk will make it schema-aware for your databases, so your team can describe what they want in plain language and get a working query back. See Set up the AI assistant below.
Invite a teammate
Approvals need at least two people: one to submit a query and one to approve it. To add your teammate:
- Click the Settings gear icon at the bottom of the left navigation.
- Click Users in the Settings navigation.
- Click the Invite User button.
- In the Invite user window, enter your teammate's name and email address.
- Leave all Permissions unchecked. Your teammate doesn't need admin permissions to approve queries; approval is granted per database in the next section.
- Click Add & invite. Your teammate appears in the Users list with a Pending invite status.
The Invite user window shows whether adding this user uses an available license or adds a seat, along with the cost of any added seat. You will not be charged during your trial period. Settings > Billing always shows your actual billing.
Invited users do not receive an email invitation. Send your teammate your instance URL, which is the address in your browser up to and including .devhub.cloud. For example:
https://g3flb73q.devhub.cloud or https://<your_company_name>.devhub.cloud
- Your teammate opens the instance URL and signs in with the invited email address. They can enter the address and click Sign in, which emails them a sign-in code, or continue with Google, Microsoft, or GitHub.
When signing in with Google, Microsoft, or GitHub, the account's email address must match the address you invited.
If you are testing this as a single user with a second email address, use a different browser or private browsing window to avoid logging into the same session as the original user.
Create an approval flow
An approval flow is a credential with Reviews set to 1 or higher. Queries run under that credential wait for approval before they execute. The recommended setup uses two credentials:
- Read-only user: Reviews set to
0. Queries run immediately, which is safe because the user can't change anything. - Read/write user: Reviews set to
1or higher. Any query that could modify data waits for a second set of eyes.
This two-credential setup is a recommended best practice: a read-only credential for unrestricted data exploration, and a read/write credential with a review gate on any query that can modify data. You connected the read-only user during setup. Now you'll add the read/write user and make your teammate an approver.
Changes on the database settings page save as you make them. There is no Save button. Complete every field of a new credential before leaving the page.
Add the read/write credential
- On the Databases page, click the gear icon next to your database. From the query interface, you can also click Settings in the database menu.
- In the Credentials section, click + Add Credential.
- Enter the read/write user's Username and Password.
- Set Reviews to
1. - Click Test Connection under the new credential. Connection successful confirms QueryDesk can reach your database as that user.
Each credential has the following fields:
- Username - the database username.
- Password - the password for that user.
- Reviews -
0executes queries immediately. Any other number holds queries in the pending queue until that many approvals are collected. A user with read-only access would typically be set to0. - Timeout (seconds) - stops queries run under this credential if they haven't completed within the specified time.
- Default - when checked on a credential with Reviews set to
0, this credential is used by default for table views and proxy connections.
You can have as many reviews in the Reviews field as you have approvers. For example, setting Reviews to 5 instead of 1 would require 5 separate approvals from 5 separate reviewers.
Make your teammate an approver
Your teammate must have signed in at least once before these steps.
- On the same settings page, scroll down to RBAC (Role-Based Access Control) and click Add user.
- In the Assign user dropdown, select your teammate and click Add user.
- In your teammate's Permission dropdown, select Approver. This user can now approve queries on this database.
Leave Restrict access to assigned users only turned off for now. While it's off, any user in your QueryDesk organization can run queries against this database, and RBAC entries grant additional permissions such as Approver.
Other database settings
The database settings page includes settings that aren't part of initial setup:
- Tunnel - used to connect to databases inside a private network. Tunnels are configured in Settings > Tunnels. See Tunnels. If you're unsure whether your database requires one, ask your IT, DevOps, or Engineering team.
- Group (optional) - groups multiple databases together in the Databases list.
- Encryption - the same SSL settings as the Advanced section of the setup page.
- Slack channel - if you've connected Slack in Settings, enter a channel name here, for example
#prod-query-approvals. Query submission notifications will be sent to that channel when a query is pending review. - Restrict access to assigned users only - limits access to the users and roles listed in RBAC. For each user or role, set a Permission (Run Queries or Approver) and optionally assign a Data protection policy. Users are managed in Settings > Users, roles in Settings > Roles, and data protection policies via the Manage policies link in the RBAC section. A role can also grant super admin, manager or billing admin to everyone in it, from Grant permission on the role's page.
- Allow super admins to bypass required reviews - adds a Bypass & run button to pending queries for super admins, which runs the query without an approval. On by default.
Run a query through an approval flow
Submit a query for review
- In the query interface, type a query in the query pane. If you're using the PTFG sample database, this freezes a single fictional account:
UPDATE accounts
SET status = 'FROZEN'
WHERE account_number = 'PTFG-00100003';
If you connected your own database, a simple SELECT statement is fine. Any query run under the read/write credential requires review, including a SELECT.
- Click the arrow next to Run query to open the Run query window.
- Set Run as to your read/write credential (1). The window shows 1 review required.
- Click Request review (2).
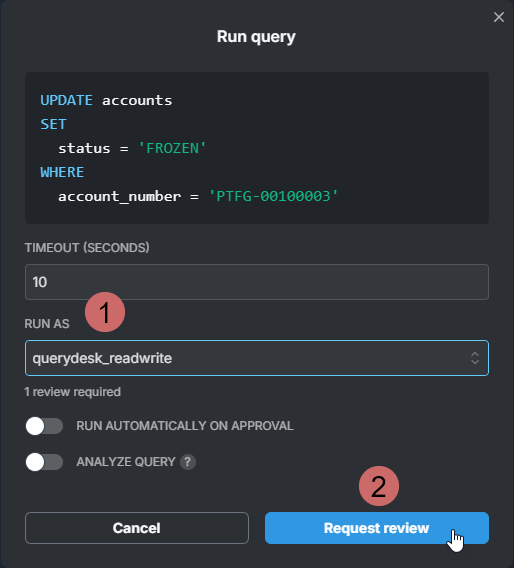
Turn on Run automatically on approval in the Run query window to have the query run as soon as it's approved. Nobody has to come back to run it.
Because the read/write credential requires one review, the query is not executed immediately. A notification confirms that the query is pending approval, and the query is submitted to the Pending queries queue. Both the submitting user and the reviewer can access the pending query via Pending queries in the left-hand navigation.
QueryDesk does not yet notify approvers in the app or by email. If you've connected Slack and set a Slack channel on the database settings page, a notification is posted there. Otherwise, let your teammate know a query is waiting.
Approve the query
Your teammate approves the query:
- Click Pending queries in the left navigation. The Approver for filter shows only the queries this user can approve.
- Review the query and click Approve. Approving does not execute the query.
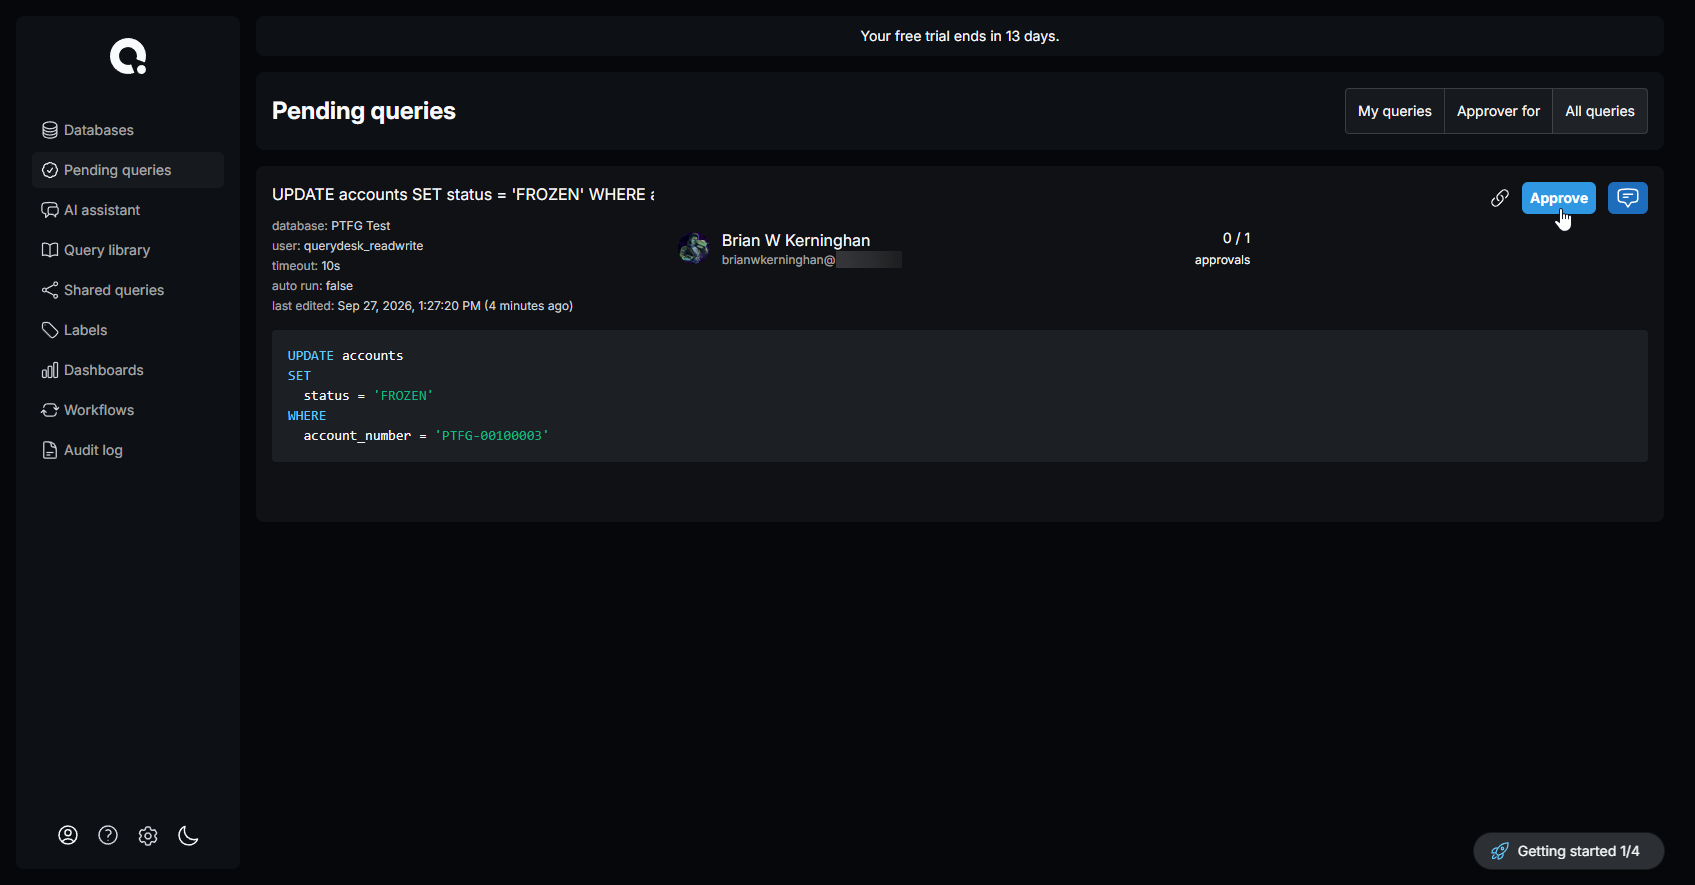
Each pending query displays the database and credentials it will run against, the timeout setting, when it was last edited, and the full query text.
From this view, a user with approver permissions can:
- Click the link icon to copy the link to the clipboard
- Click Approve to approve the query
- Click the comment icon to comment on the query
Run the approved query
Back in your own session:
- Click Pending queries in the left navigation. The approval count on your query now reads 1/1.
- Click Run Query. The Query result window shows the outcome, for example
UPDATE 1. - Click Done.
Once a query has been run, it is removed from the Pending queries view.
While a query is pending, the submitting user can also click Edit to modify it, Delete to discard it, or the comment icon to comment on it.
When your team uses QueryDesk in production, this separation between submitter and approver is the intended workflow. A user submits a write query; an engineer, DevOps lead, or designated approver reviews it before it runs. Queries that pose a real risk to production data don't execute until at least a second set of eyes clears them.
Evaluating on your own? With Allow super admins to bypass required reviews turned on (the default), a super admin sees a Bypass & run button on their pending query in Pending queries. Click it to run the query without an approval. Bypassed queries are flagged in the audit log, and the Bypassed only filter shows them all. Obviously, this is not a best practice in prod. For production databases, turn the setting off so every query on a gated credential gets its review.
Check the audit log
Click Audit log in the left navigation.
Every query that ran during this session is captured here: the database it ran against, the user and credentials, the timestamp, and the full query text. Queries that failed are recorded too. The queries you ran as your read-only user are here. So is the query you submitted and your teammate approved, along with its approval count. Rest the pointer on the initials under the count, or tab to them, to see who approved and when.
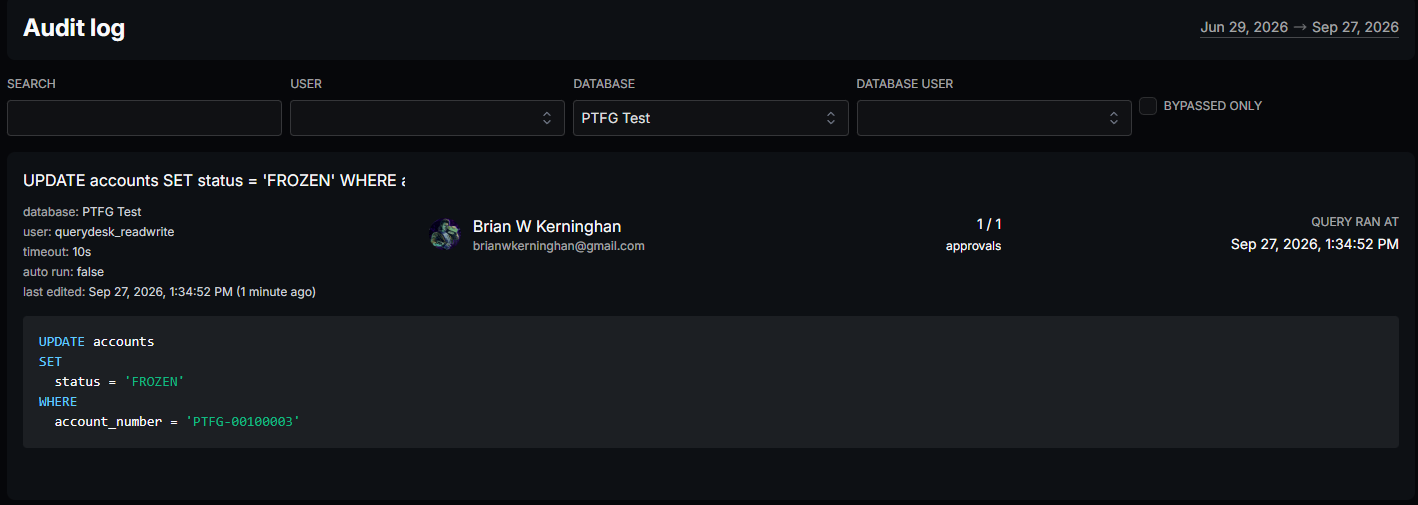
No configuration required. The audit log is always on. Watching. Waiting.
During a SOC 2 audit or an internal security review, this record is immediately available. There is no manual log reconstruction and no hunting across systems; every access event is captured automatically. You can also feed this log into your existing security tooling.
Set up the AI assistant
The AI assistant lets anyone on your team describe what they want in plain language and get a query back, without needing to know SQL. Rather than shipping a built-in model, QueryDesk has you bring your own: you supply an API key for an AI provider you already trust, and prompts and responses flow directly between your QueryDesk instance and that provider. You stay in control of where your data goes and which vendor policies apply. One AI model can be configured per QueryDesk instance.
QueryDesk makes the AI schema-aware for your specific databases, so the generated queries match the tables and columns you actually have.
- Open a database from Databases, click AI assistant in the database panel, then click Setup AI. This opens Settings.
- Click Integrations in the Settings navigation, then click Settings next to AI.
- Select a model from the Model dropdown, enter your API key for that model, and click Save.
Once saved, return to AI assistant in the database panel to open a conversation. Describe what you want to query in plain language. The assistant will generate SQL that you can run or edit before executing. Because your database schema is attached as context on every request, the suggestions are tailored to your specific databases without any training step on your part. The current date and time, in the timezone set in your account settings, are attached too, so relative requests like "last week" resolve against the real calendar.
What's next
With your database connected and your first approval flow complete, you've covered how QueryDesk handles the fundamentals: unified database access, controlled write operations with approval flows, and automatic audit logging. The following areas are worth exploring next:
- Integrations: connect Slack, Linear, AI, and GitHub to your QueryDesk instance to enable workflows.
- Workflows: automate multi-step processes by chaining database queries, API calls, Slack notifications, and human approvals into a single, repeatable operation.
- Data protection: configure field-level masking policies that control which columns are visible to which users, enforced automatically at query execution time so sensitive data stays in your database.